<< BO Online Help >>
MONITORING
MAINTENANCE
REMOTE ADMINISTRATION
REPORT
VIEW
HELP
DATE: 2026-03-20 TIME: 02:19:43
| This help file covers the following topics: | |
|
|
The Cash Settlement History report provides a history of all cash settlements for a selected machine at a specified date and time. The count and amount from each of the steps within the settlement process are provided in this report. This report is generated for a selected property.
Shown below is an example of a Cash Settlement History report.
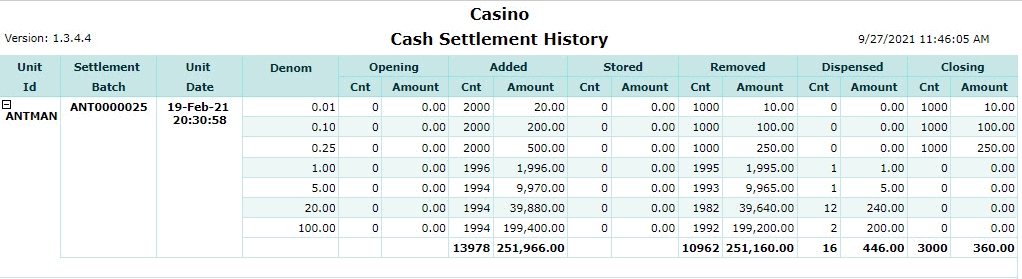
Given below are the field names and description of the fields displayed in this report:
| 1. * Unit ID | Displays the ID that identifies the QuickJack unit. (grouped by unit ID) |
| 2. Sett Batch | Displays the settlement batch number. |
| 3. Unit Date | Displays the date and time of settlement. |
| 4. Denom | Displays the denomination of the bills and coins. For example, $1, $5, $20, and $50. |
| 5. Opening | Displays the count and amount available when starting the settlement process. Note:
|
| 6. Added | + Displays the count and amount added to cassettes and hoppers. |
| 7. Stored | + Displays the count and amount of bills stored in recycler. (should be $0, in most cases) |
| 8. Removed | - Displays the count and amount returned to the cage. |
| 9. Dispensed | - Displays the count and amount dispensed. |
| 10. Closing | Displays the count and amount when closing the settlement process. |
The sort order is Unit ID | Unit Date.
| Notes: | 1. * | Click on unit ID with (+) sign to expand and (-) sign to collapse section (show/hide rows). | |
| 2. * | All unit ID sections can be expanded (or) collapsed using "Open All" on the report toolbar. | ||
| 3. | Opening count & amount should equal closing count & amount from last settlement process. |
Shown below is an image of the report filter screen:

To filter the report, do the following:
| 1. * Date Range | Select a date range based on which you want to filter or filter with the default date(gaming day). |
| 2. + Machine | Select any machine(s) based on which you want to filter the data. For more information, see notes below. |
| 3. + Mach Group | Select any machine group(s) based on which you want to filter the data. For more information, see notes below. |
| 4. + Mach Location | Select any machine location(s) based on which you want to filter the data. For more information, see notes below. |
| Submit button will generate and display a report in html format along with the HTML report toolbar. |
| Notes: | 1. * | The default date range is based on the GamingDayStart and GamingDayEnd system parameters. | |
| 2. * | You can enter a new date using the format yyyy/mm/dd (or) select one using the calendar tool. | ||
| 3. + | These lists are automatically populated with the machines, groups and locations for the current property. | ||
| 4. + | If no machines, groups or locations selected, the report is based on all machines for the current property. | ||
| 5. + | The Unit IDs which match the selected machines (or) groups (or) locations are included in the report. | ||
| 6. + | You can select more than one machine, group, or location within a list by using Ctrl+Click or Shift+Click. |
 This toolbar provides refresh, search, export, print, page navigation etc.
| 1. Preview | Click Preview to display the report as a PDF file in the browser window. |
| 2. Style | Select the style of the report, such as color, gray scale, or no fill. |
| 3. Open All | Click the Yes radio button to expand and show detail lines for all collapsed sections. (with (+) sign) |
| 4. Report Format | Select the report format, such as PDF or Excel from the drop-down list, then click GO to export report in selected format. |
| 5. Navigation | Use navigation controls to move forward or backward through the report pages. |
| 6. Parent Report | Click to return to the parent report. (if currently within child report) |
| 7. Search | Enter search string and then click find and next to move through matches. (case-insensitive) |
| 8. Refresh | Click the Refresh button to reload the report with current data. |
| 9. + Print | Click the Print button to open the print dialog box and specify the print options. (must install "print control" first!) |
 |
Click in the textbox to display the calendar tool. Use the "<" and ">" links to navigate to the previous or the next month. Click on a day within the month displayed to change the date. |