<< BO Online Help >>
MONITORING
MAINTENANCE
REMOTE ADMINISTRATION
REPORT
VIEW
HELP

DATE: 2025-12-16 TIME: 00:05:42
REPORTS / PATRON REPORT
| This help file includes the following topics: | |
|
|
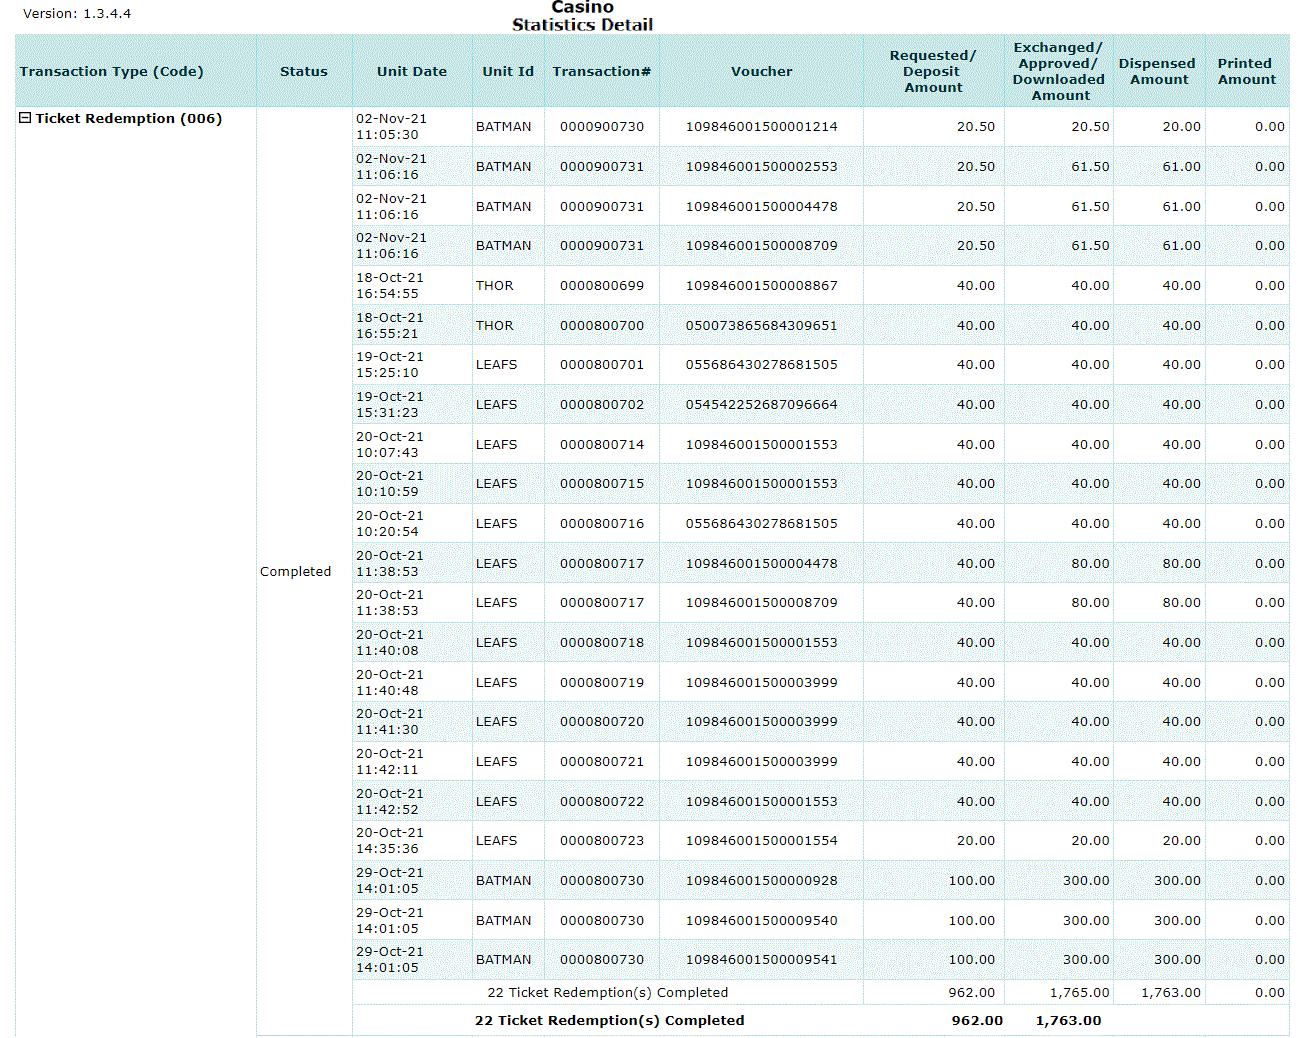
The Statistics Detail report provides a detailed breakdown of transactions performed by a patron. Transactions are grouped by transaction type and status with totals provided for each monetary column and separate totals provided for each currency or combination of currencies.
Patron transaction types include the following:
| 001 - ATM Withdrawal | 005 - Bill Breaking | 010 - POS Debit |
| 002 - WAT Withdrawal | 006 - Ticket Redemption | 015 - Check Cashing |
| 003 - WAT Deposit | 007 - Point Redemption | 016 - Offers Redemption |
| 004 - Currency Exchange | 009 - Cash Advance |
Shown below is an example of a Statistics Detail report.

Given below are the field names and description of the fields displayed in this report:
| 1. Transaction Type (Code) | Displays the transaction type and the corresponding code for the transaction performed by the patron. |
| 2. Status | Displays the current status of the transaction performed. (status list) |
| 3. Unit Date | Displays the date and time when the transaction was performed. |
| 4. UnitID | Displays the unit ID or name that identifies the QuickJack unit. |
| 5. Transaction# | Displays the transaction identification number. |
| 6. Voucher | Displays the voucher or ticket number. |
| 7. Requested/Deposit Amount | Displays the amount requested or deposited by the patron. |
| 8. Exchanged/Approved/Downloaded Amount | Displays the exchange amount received, the approved amount received, or the amount downloaded by the patron. |
| 9. Dispensed Amt | Displays the amount dispensed to the patron. |
| 10. Printed Amt | Displays the amount printed on a ticket or POS slip. |
The sort order is Transaction Code | Status Code | Transaction ID.
 This toolbar provides refresh, search, export, print, page navigation etc.
| 1. Preview | Click Preview to display the report as a PDF file in the browser window. |
| 2. Style | Select the style of the report, such as color, gray scale, or no fill. |
| 3. Open All | Click the Yes radio button to expand and show detail lines for all collapsed sections. (with (+) sign) |
| 4. Report Format | Select the report format, such as PDF or Excel from the drop-down list, then click GO to export report in selected format. |
| 5. Navigation | Use navigation controls to move forward or backward through the report pages. |
| 6. Parent Report | Click to return to the parent report. (if currently within child report) |
| 7. Search | Enter search string and then click find and next to move through matches. (case-insensitive) |
| 8. Refresh | Click the Refresh button to reload the report with current data. |
| 9. + Print | Click the Print button to open the print dialog box and specify the print options. (must install "print control" first!) |
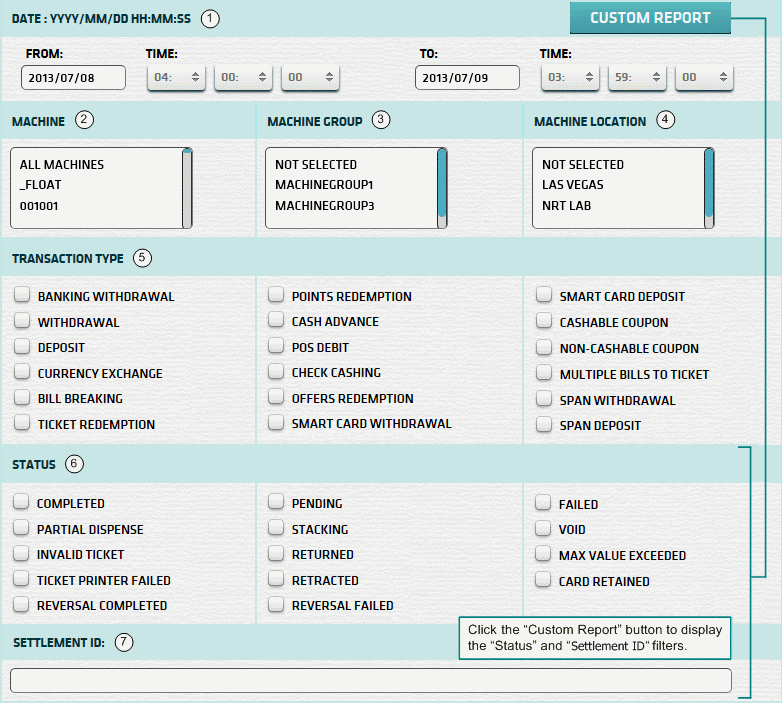
Shown below is an image of the report filter screen.

To filter the report, do the following:
| 1. * Date Range | Select a date range based on which you want to filter or filter with the default date (gaming day). |
| 2. + Machine | Select a machine based on which you want to filter the data. For more information, see notes below. |
| 3. + Mach Group | Select a machine group based on which you want to filter the data. For more information, see notes below. |
| 4. + Mach Location | Select a machine location based on which you want to filter the data. For more information, see notes below. |
| 5. Transaction Type | Select transaction type(s) based on which you want to filter the data. (none selected = all trans types) |
| 6. Status | Select status(es) based on which you want to filter the data. (none selected = all statuses) For more information on how to display the STATUS filter option, see notes below. |
| 7. Settlement ID | Type the settlement ID based on which you want to filter the data. For more information, see Settlement ID. |
| Click the Submit button to generate and display a report in html format along with the HTML report toolbar. |
| Notes: | 1. * | The default date range is based on the GamingDayStart and GamingDayEnd system parameters. | |
| 2. * | You can enter a new date using the format yyyy/mm/dd (or) select one using the calendar tool. | ||
| 3. + | These lists are automatically populated with the machines, groups and locations for the current property. | ||
| 4. + | If no machines, groups or locations selected, the report is based on all machines for the current property. | ||
| 5. + | The Unit IDs which match the selected machines (or) groups (or) locations are included in the report. | ||
| 6. + | You can select more than one machine, group, or location within a list by using Ctrl+Click or Shift+Click. | ||
| 7. | You can display the STATUS filter option by clicking on the CUSTOM REPORT button located on the top left-hand side of the report filter screen. |
The Settlement ID is composed of the Unit ID Prefix and the Settlement Batch Number. It can be obtained from the Settlement Slip or the Cash Settlement History Report.
 |
| Notes: | 1. | When you enter a settlement ID, the date range setting is ignored. | |
| 2. | The Unit ID Prefix is the 1st 3 characters of the Unit ID. (e.g. Unit ID = 'QJ201' Prefix = 'QJ2') | ||
| 3. | The settlement ID can be common to more than one machine, if they share the same unit ID Prefix. | ||
| 4. | Enter the settlement batch number without leading zeroes. (e.g. '26' rather than '0000026') |
 |
Click in the textbox to display the calendar tool. Use the "<" and ">" links to navigate to the previous or the next month. Click on a day within the month displayed to change the date. |
|
|