<< BO Online Help >>
MONITORING
MAINTENANCE
REMOTE ADMINISTRATION
REPORT
VIEW
HELP
DATE: 2026-03-20 TIME: 02:14:20
| This help file covers the following topics: | |
|
|
The Audit report provides an audit trail of the changes made to records within the BO database for a specified period. The database records can be filtered based on employee ID, database table, and type of action.
Shown below is an example of an Audit report.
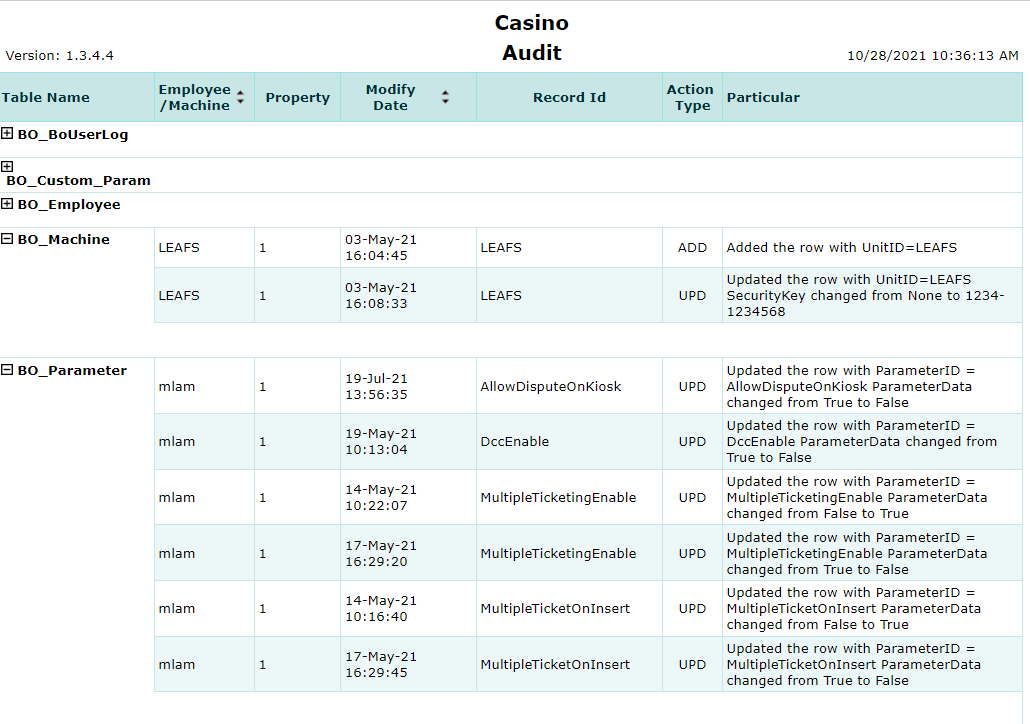
Given below are the field names and description of the fields displayed in this report:
| 1. Table Name | Displays the name of the table in which the records are changed. |
| 2. Employee/Machine | Displays the name of the employee or the name of the machine making changes to the records in the table. |
| 3. Property | Displays the ID of the property where the machine is located. |
| 4. Modify Date | Displays the date and time when the record was added, deleted or updated. |
| 5. Record ID | Displays the ID that identifies the record being changed. |
| 6. Action Type | Displays the type of action performed on the record. For example, ADD means a row is added to the record and UPD means a row is updated. |
| 7. Particular | Displays the details of the action performed on the record. |
| Notes: The default sort order is Modify Date. For more information on report sort order, see Report Sort Order. |
Shown below is an image of the report filter screen.
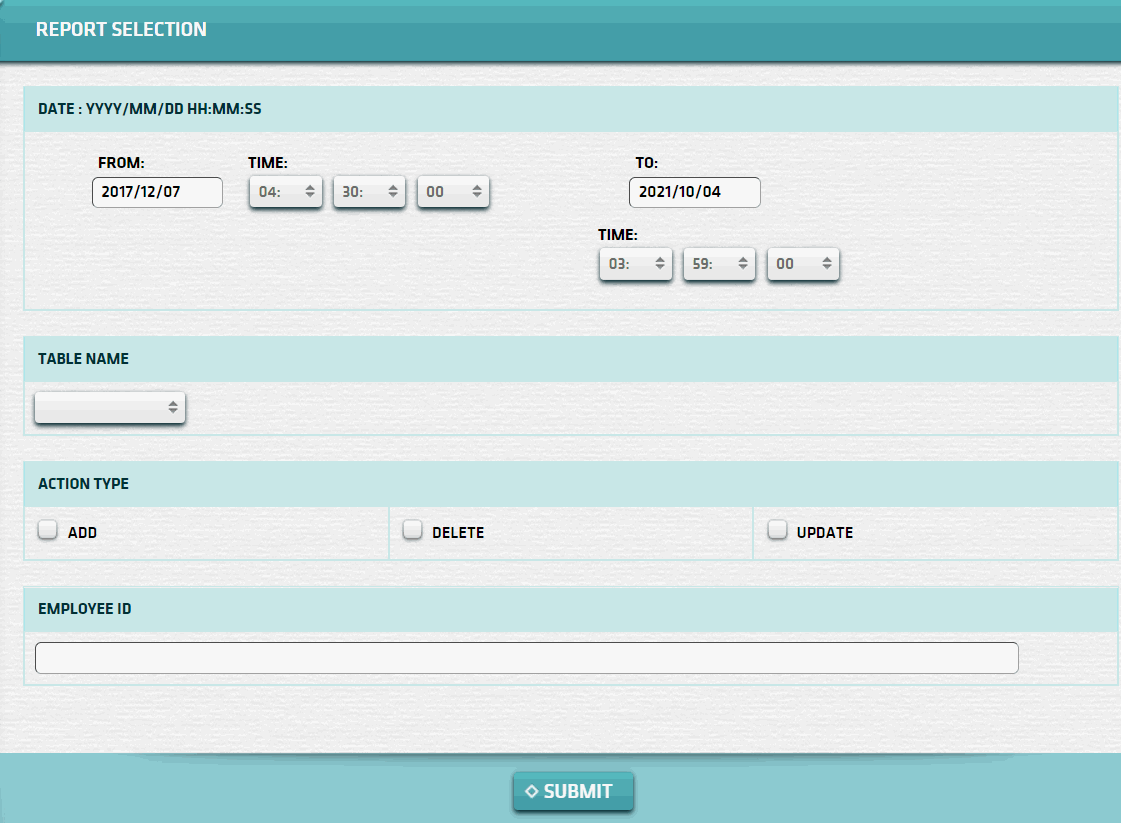
To filter the report, do the following:
| 1. * Date Range | Select a date range based on which you want to filter or filter with the default date(gaming day). |
| 2. Table Name | Select a table name based on which you want to filter the data. |
| 3. Action Type | Select an action type(s) checkbox based on which you want to filter the data. (none selected = all types) |
| 4. Employee ID | Enter an employee ID to filter the data for a specific employee. |
| Submit button will generate and display a report in html format along with the HTML report toolbar. |
| Notes: | 1. * | The default date range is based on the GamingDayStart and GamingDayEnd system parameters. | |
| 2. * | You can enter a new date using the format yyyy/mm/dd (or) select one using the calendar tool. |
You can sort the html report based on one of the following fields:
To change the report sort order, click the sorting arrows to toggle between the ascending and descending order.
| Notes: | 1. | An up arrow indicates an ascending sort and a down arrow indicates a descending sort. | |
| 2. | Clicking a sort control will collapse an "expanded" section if Open All on the toolbar is set to "No"!!! |
 This toolbar provides refresh, search, export, print, page navigation etc.
| 1. Preview | Click Preview to display the report as a PDF file in the browser window. |
| 2. Style | Select the style of the report, such as color, gray scale, or no fill. |
| 3. Open All | Click the Yes radio button to expand and show detail lines for all collapsed sections. (with (+) sign) |
| 4. Report Format | Select the report format, such as PDF or Excel from the drop-down list, then click GO to export report in selected format. |
| 5. Navigation | Use navigation controls to move forward or backward through the report pages. |
| 6. Parent Report | Click to return to the parent report. (if currently within child report) |
| 7. Search | Enter search string and then click find and next to move through matches. (case-insensitive) |
| 8. Refresh | Click the Refresh button to reload the report with current data. |
| 9. + Print | Click the Print button to open the print dialog box and specify the print options. (must install "print control" first!) |
 |
Click in the textbox to display the calendar tool. Use the "<" and ">" links to navigate to the previous or the next month. Click on a day within the month displayed to change the date. |
Here's a list of the cash fill transaction types:
| Code | Transaction Type |
|---|---|
| 022 | Replenish Cash |
| 023 | Replenish Coins |
| 026 | Add Cash |
| 027 | Add Coins |
| 035 | Cassette Configuration |
| 036 | Hopper Configuration |
| 039 | Recycler Configuration |
| 040 | Recycler Cash Replenishment |
| 041 | Recycler Add Cash |