<< BO Online Help >>
MONITORING
MAINTENANCE
REMOTE ADMINISTRATION
REPORT
VIEW
HELP
DATE: 2026-03-20 TIME: 02:14:15
| This help file covers the following topics: | |
|
|
This report provides an audittrail of Service & Operating Panel (SOP) transactions for the date range selected. Transactions can be filtered based on employee ID and machine.
Here's an example of an SOP Audit Report.
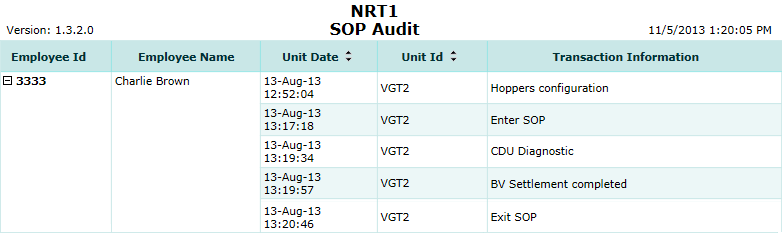
Here's a description of the columns used in this report:
| 1. Employee ID | Employee ID of employee performing the action. |
| 2. Employee Name | Name of employee performing the action. |
| 3. Unit Date | Unit Date is the date/time of the SOP transaction. |
| 4. Unit ID | Unit ID of the QuickJack unit being serviced. |
| 5. Transaction Info | Information about the transaction. (the action taken) |
The default sort order is Unit Date; however, the report sort is customizable.
 This toolbar provides refresh, search, export, print, page navigation etc.
| 1. Preview | Preview will display the report as a PDF file in the browser window. |
| 2. Style | Select style of report. (color | gray scale | no fill) |
| 3. Open All | Select "Yes" to expand and show detail lines for all collapsed sections. (unit ID with (+) sign) |
| 4. Rpt Format | Select report format (e.g. PDF, Excel) from list, then click GO to export report in selected format. |
| 5. Navigation | Use navigation controls to step forward or backward through report pages. |
| 6. Parent Rpt | Return to parent report. (if currently within child report) |
| 7. Search | Enter search string and then use find and next to step through matches. (case-insensitive) |
| 8. Refresh | Refresh report reloading with current data. |
| 9. + Print | Open print dialog box so that you can specify print options. (must install "print control" first!) |
You have the option of sorting the html report based on one of the following fields:
| Notes: | 1. | An up arrow indicates an ascending sort and a down arrow indicates a descending sort. | |
| 2. | Clicking a sort control will collapse an "expanded" section if Open All on the toolbar is set to "No"!!! |
Here's a screenshot of the report filter screen.
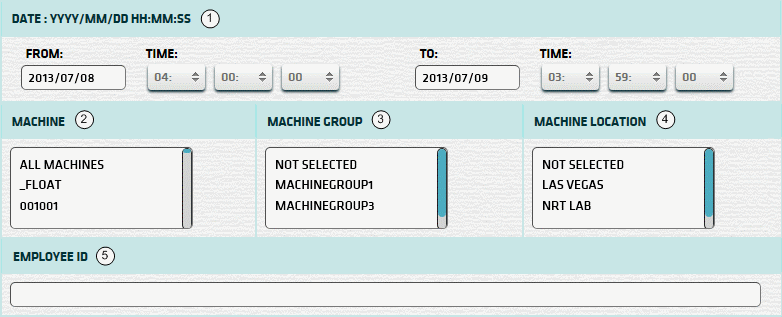
| 1. * Date Range | Select a date range to filter on (or) go with the default (gaming day). |
| 2. + Machine | Select any machines which you would like to filter on. (see notes below) |
| 3. + Mach Group | Select any machine groups you would like to filter on. (see notes below) |
| 4. + Mach Location | Select any machine locations you would like to filter on. (see notes below) |
| 5. Employee ID | Enter employee ID to filter for a specific employee. |
| Submit button will generate and display a report in html format showing the HTML report toolbar. |
| Notes: | 1. * | The default date range is based on the GamingDayStart and GamingDayEnd system parameters. | |
| 2. * | You can enter a new date using the format yyyy/mm/dd (or) select one using the calendar tool. | ||
| 3. + | These lists are automatically populated with the machines, groups and locations for the current property. | ||
| 4. + | If no machines, groups or locations selected, the report is based on all machines for the current property. | ||
| 5. + | The Unit IDs which match the selected machines (or) groups (or) locations are included in the report. | ||
| 6. + | You can select more than one machine, group, or location within a list by using Ctrl+Click or Shift+Click. |
 |
Click in the textbox to display the calendar tool. Use the "<" and ">" links to navigate to the previous or the next month. Click on a day within the month displayed to change the date. |
|
|